Leather Banner

Leather Banner

Tuesday, September 27, 2011

A Journal Cover Part II

We're back to the journal cover.  After the first night I skived the spine again and began tooling.


I decided to do a Celtic knot design around the edge with the "Triforce" from the video game "Zelda" in the center.  I really like the look of Celtic designs on leather.  You will find I do a lot of Celtic design in my work.  The only problem with these designs is that they are time consuming.  There is a lot of cutting and beveling involved.  But if you take your time it will look great.  Another thing about Celtic designs is that they are forgiving to mistakes.  If your lines don't match up perfectly or the widths of the lines are off it won't matter in the end.  After you cut and bevel all of the pieces it won't be as apparent.


This project called for the basic swivel knife cutting, and then beveling of the project.  One thing that is important, especially with Celtic designs is that you have bevel in order.  You need to find what would be the "lowest" point and then bevel those parts first.  Then working your way "up" bevel the next "lowest" point and so on.  You can ignore this but your design just won't look right.  While Celtic designs are forgiving to imperfect cuts it is not forgiving to poor beveling.  After I finished beveling I decided to use the background tool to fill in the space between the lines of my knot.  I'm glad I did this at it really gave the whole piece some more depth.    


When the tooling was finished I wet formed the leather to the book again to ensure it was shaped properly to the book.  As I mentioned in the previous entry, this step should have not happened until after I was done tooling and punching the holes.  Because I had to have flatten the piece out again only to have to wet form for a third time.  We learn as we go!

I finished off the piece with a cherry stain.  I really like this stain as it gives the leather an almost wooden look.
 

After that it is just a matter of using rubber cement to glue the lining leather to main piece of leather.  The large lining piece was cemented completely while the pockets were only glued along the very edge.  I let the piece sit over night so the cement would stick.  The next day I sat down and got ready to punch some holes.  Because I put the design so close to the edge, and I had to use a large hole punch, I had to be very careful.

I use a set of punches that screw onto a handle that is punched with the mallet.  You can also use a prong punch or a rotary punch.  I like the punch set because it gives you a lot of options and is the easiest in terms of stamina.  (The prong punch would be easier but it only does one size while punching four holes at a time.)

First I stropped my punch.  (Take some jewelers rouge and a small scrap piece of leather and rub the rouge on the flesh side of the leather.  Then take your punch and slide it at the angle of the blade of the punch while spinning the punch around.  Then take some beeswax and put the punch in the wax.  Doing this will make the punching go so much easier.)  I then began to punch.  You want to try and keep it as straight as possible.  The good news is that if you are doing a double loop stitch it won't be such a huge issue but it still is a good idea to keep it as straight as you can.  Punch away.  Every now and again strop and re wax the punch.

When I was finished I used a suede lace to finish it off with a double loop stitch.  After putting the journal into the cover I was really pleased with this project.  This marked the first project that I put together entirely from the scratch.  (I have put things together without the benefit of a kit but I always used a premade pattern.)  Here I did everything, pattern all the way to finish, from scratch.

Let me know what you think.


theslackjaw@gmail.com

Happy Crafting!


Monday, September 26, 2011

Stitching Project Part Two: Double Loop Stitch

Here we are at part two of our stitching series.  Today we are going to discuss the Double Loop Stitch.  This is the stitch that I have used the most in my leather craft projects.  It sounds complicated at first but after a while it becomes really easy to understand and do properly.  The most important thing to remember is to make sure the lace does not "kink" as you go.  You just need to make sure the finished side of the lace is always facing up when the lace is pulled tight.


You start the stitch by pulling the lace through the "outside" hole and then looping it through the next hole like you are starting the basic loop stitch.


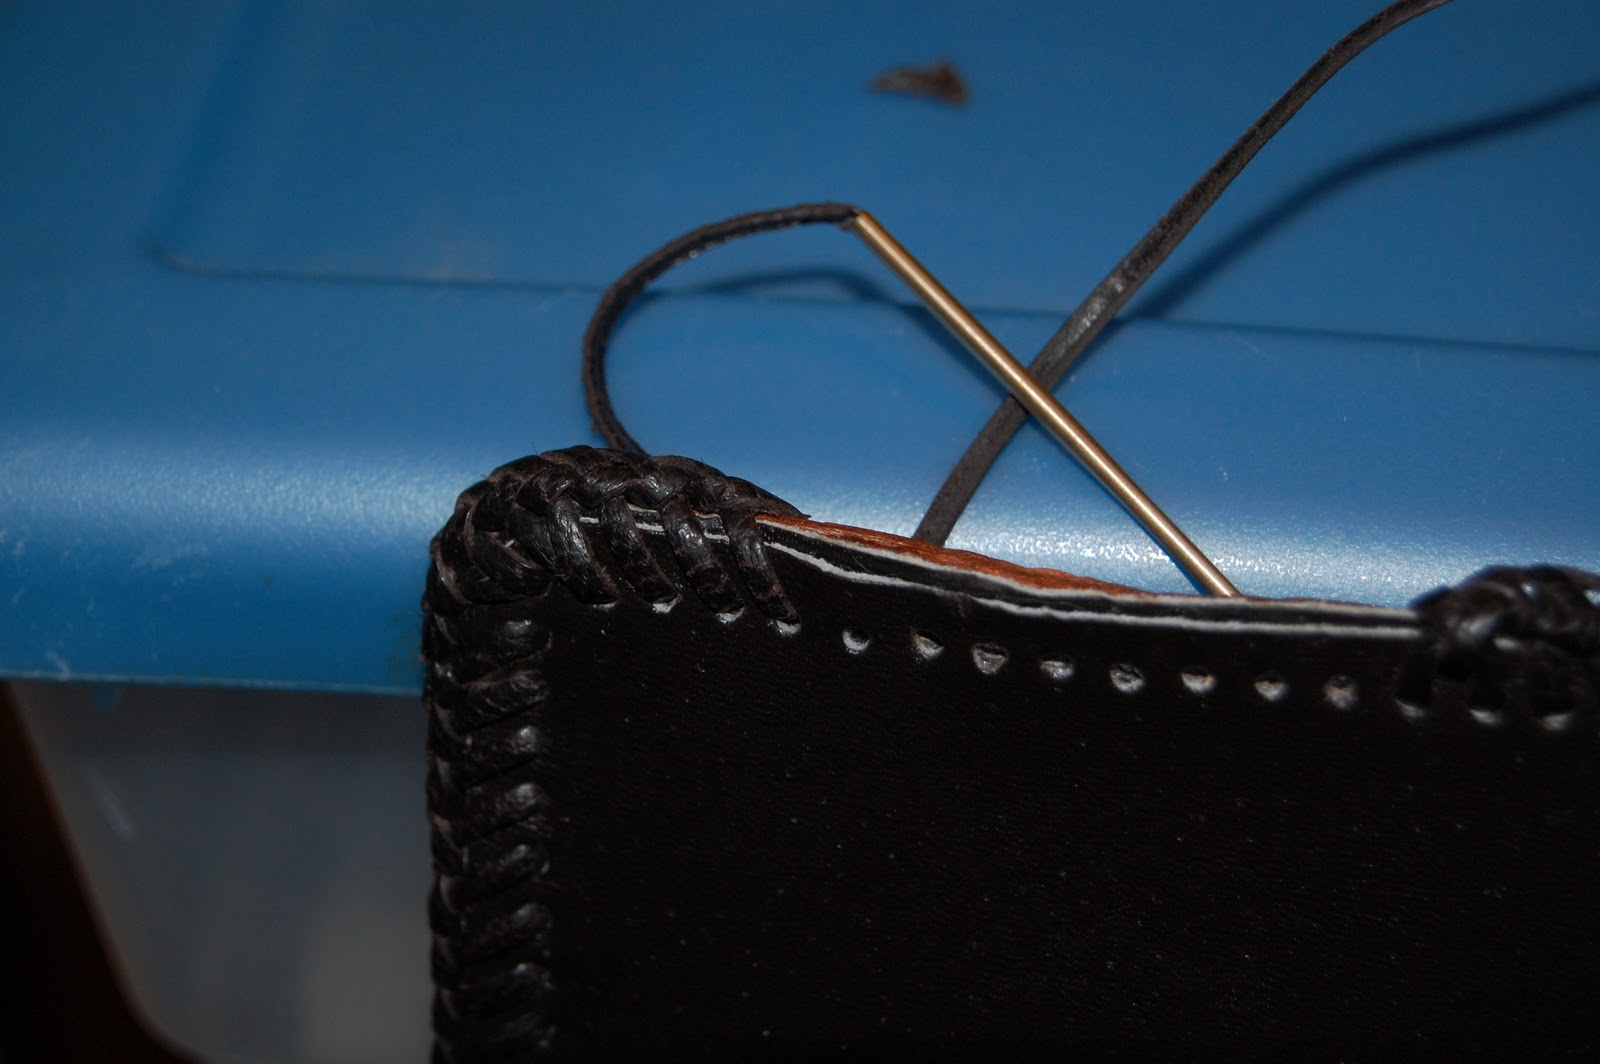
BUT before you pull the stitch tight put the excess lace through the loop you are about to pull to create X when you pull the loop tight.  (NOTE: Do not pull this too tight.  We need it to be a bit loose.)


Now you are going to put the needle under that X you created and pull the lace through and pull the stitch tight.  (This one can be a bit tighter, except when we get to the corners, you will see why.)


  Then pull the needle through the next hole and pull it through.  You will see that it has created another X, to which you will pull the needle up through and repeat.


When you reach a corner things get a little tricky.  Basically you need to stitch twice over again on each corner hole.  Any "official" double loop stitch directions may say three stitches per corner hole but I think that is a bit overkill.  Two stitches per corner hole should be fine.  Basically you pull the needle through the hole like you normally would, pull up through the X like normal, then pull it through the same hole again.  Pull it through the X like normal, THEN you can move to the next hole.  Repeat with the rest of the holes on the corner.  It isn't really that tricky when you think about it but it can be hard to do as sometimes the holes may not be able to fit the lace.  In these cases you can use an awl and try to widen the hole a bit.  (Or if you have a pen or something pointy to stick in the hole to widen it . . . Doug, I hear you snickering in the back . . .quit it.)

Finishing and splicing the double loop stitch is a little tricky.  To this day I have to refer to my directions to get it right.  (It makes sense because it is something you only do once or twice a project and if you only do a few projects a year you can forget it easily.)  Because I'm working with leather more it is beginning to stick.

Splicing, actually, is very easy.  You just put the needle between the leathers and pull it through on the "outside" of the project.


You do this about three or four holes away from where you were previously stitching.  Continue with the "old" lace until you get to the "inside" hole that matches the "outside" hole you pulled the new lace through.


You pull the old lace up between the leathers then cut off the excess.  Tuck it between the leathers and continue with the new lace.  Simple really.

Finishing off the stitching is where it can get tricky.  When you reach the end you need to stop about four holes from the end.


Using an awl or your needle you need to pull the excess lace from the begining of the stitch out from under the lace.  (This is the excess you folded under the loop to create the "X".)


Then pull it through the hole and then down again through a loop that has been created.  Now you should have this loop and the excess lace coming from hole in the leather. Pull this excess up between the leathers and cut the extra and tuck it back down.


Now continue to lace like normal.  Eventually you will end up pulling the lace through a hole and it will leave you with a hole on the inside but no other hole on the outside. Here you take the lace and pull it up through that loop that is hanging from the beginning of the lace and then pull it through the last "X" you created with the end of the lace.


Do not pull that stitch tight!  Now pull the lace back down through that loop, again not pulling it tight yet.  Now you need to push the two ends as close together as possible.


After you are satisfied that you have closed the gap as well as you can you pull the stitches tight and then pull the lace through the last hole on the inside and up between the leathers through the stitching and pull it tight.


Cut the excess lace and tuck it down.  You are now finished.


I know that last bit is complicated and I tried to put in as many pictures as I could to illustrate.  If you have any questions please do not hesitate to contact me at:

theslackjaw@gmail.com

That's all I have for today.  I have a few new projects on the horizon after I finish these past few and I can't wait to show them to you.  Until then, Happy Crafting!


Tuesday, September 20, 2011

A Journal Cover Part I

A few months ago I was travelling through West Virginia when my wife and I stopped in Berkeley Springs to get some lunch.  We had a little time to kill and we looked around the few shops downtown.  In one store I found a journal with a leather cover.  The design on the cover was one of those machine pressed deals where you crank the leather through and it embosses a scene onto the leather.  While it was a nice cover my initial thought was, "I could do better than this!" And that is what brings us here.

When I got home I promptly picked up a journal from a local bookstore and then began measuring out the sizing to make a cover.  After marking out the sizing on the leather I had on hand I discovered I was using leather that may be a little thick for this project.  Thick leather is not very conducive to a book cover.  My other issue was I didn't have a skiver or a type of lining leather to finish the project off.  I had to set aside the project until I had the right material and tools.

Fast forward to the other day.  I received my latest shipment from Tandy and it had the last few things I needed to complete the project.  So I measured out the project on the leather (I decided to stick with the thick leather as I now had a skiver and lining leather) and then I cut the main piece out.

 After which I cut the lining leather to cover the flesh side of the vegetable tanned leather and then two smaller pieces to be pockets.  Initially I was going to do a saddle stitch which, while strong, would have the edges exposed.  As you may be able to see from the pictures the edges are a little rougher than I would like.  Double loop stitch it is!

I realize now that I'm going to have to do some extra steps to make the piece look great.  I skived all the edges of the main piece then did extra skiving on the right and left sides to allow more room for the book cover to fit into the pocket.  I also skived two strips near where the spine of the book will be.  This is so the cover will bend a little easier when it comes time to form it to the book.

After the skiving was complete I wet the leather and then folded it over the book.  (NOTE: I don't recommend doing this step at this point.  I made a boo boo and wet formed it before I tooled the leather.  I wasn't thinking and when I tooled it I had to take it out of shape and then I had to wet form it again later.  It ended up not being a big deal and in the end it came out alright but it forced me to do some extra work I wouldn't have had to do if I had waited.)  It became apparent that the leather was probably too thick to begin with and I had not skived enough.  Regardless I continued to wet form the leather until it started to take shape.  As of right now the cover is 75% shaped to the book.  If I can get it to about 85% or more I will be satisfied.  At this point I let it sit over night folded over the book to help keep it's shape.  As you can see the cover holds it's shape fairly well.


That is all I'm going to cover for right now.  I'm currently working on the tooling of the project and I will put that in a second entry.  Hopefully I can do this in just two entries.  We'll see.  As always, send questions to:

theslackjaw@gmail.com

Until next time, Happy Crafting!


Monday, September 19, 2011

Tooling Our Checkbook Cover


Today I'm going to go over how I tooled my checkbook cover and then put on the first coat of stain.  As I mentioned in a previous post, I wanted to use my basket weaving tool.  Basically I'm going to create a border around the edge, then I'm going use my basket weaving tool to make the cover look like it has a basket weave on it's sides.  It should look really nice when I'm done.  The other nice thing about this design is it is really easy to achieve.  You get a great look with very little effort.  Let's get started.

About the color the leather should be when it is ready to be tooled.
First you wet the leather.  This is one of the bigger questions of leather craft:  How wet should your leather be? You don't want it to be too wet.  This can cause issues as the leather dries.  Then your stamps and cuts will be uneven.  I like to wait until it starts to turn back to it's natural color.

I wait another couple minutes, then I start.  The general rule is when it's cool to the touch it is ready to go.  As long as it's not dark brown you  should be safe.

Cutting a border with, surprise, the border tool.
Here I took my border tool and cut a border around the edge of my leather.  If you do not have a border tool you can just draw a line using a ruler and a pencil then using your swivel knife you can cut the border.  Now I wanted to do a slanted weave instead of a straight one so I took my ruler and made measure from corner to corner.

I then picked about the middle, you can eyeball this, and place my basket weaving stamp there.  Then I alternated (see picture) by placing the stamp adjacent to the first stamp but offset slightly.  


I have to show this part on a scrap piece of leather as I forgot to take pictures when I did the first few stamps on the checkbook cover.


Repeat.  Now is is just a matter of filling in the space.


When I get close to the border I needed to tilt the stamp slightly so I wouldn't stamp outside of the border.  After having finished with the basket weaving tool it is now time to finish the border.  The border part is easy as I took a camouflage tool and just stamped it along the border.


If I could go back and do things differently I probably would have skipped the camouflage tool.  It didn't come out as nice as I thought it would.  I think it would have been fine if I had just beveled the the edge.  The good news is it still looks good and I was able to bevel the edges and it came out nice regardless.


I would imagine a different border tool than the camouflage stamp would work well here.  Since I do not have one at this time I worked with what I have.  I'll know in the future.    

Now I moved on to staining my project.  This was a very simple task.  I laid out my drop cloth and waited to leather to fully dry.


Then I took a basic dauber and dipped it into my stain.  Using a circular motion I applied the stain to the whole piece making sure to be as even as possible.  After I achieved the appropriate evenness I let it dry.  This piece only needs one coat so when it is dry we can move onto to lacing it.


After it dried I used rubber cement to apply the lining to the leather.  For the large piece of lining I cover the whole piece with cement but for the pockets I only cemented the edges.  After the cement has dried it is time to lace.


Using a basic double loop stitch I will complete the project.  (I will write a separate entry on stitching.)


Well there is our checkbook cover.  (I will post a picture of the finished product when I'm doing stitching it.  Should be done in a day or two.)  Let me know if you have any questions by emailing me at:

theslackjaw@gmail.com

Until next time, Happy Crafting!  

UPDATE: I have finished the Checkbook Cover:


What do you think?

Friday, September 16, 2011

Stitching Projects Part One: Intro to Stitching

Today I'm starting my three part series in stitching leather projects.  There are many different ways you can put a project together but I want to highlight the five different ways I know how stitch leather.  I also want to show you my favorite methods.

I decided to do this as a three part series so you can find how to do a certain stitch with ease.  I figured it would be easier this way instead of having you slog through a massive entry looking for details on how to do a saddle stitch.  

Let's get started:

Today we are going to take a look at two basic stitching methods.  I wanted to look at these two methods at the same time because they are very easy.  I also want to note that I rarely, if ever, use these stitches.  Don't let my bias stop you from doing them but I feel they just aren't strong enough for my projects.  You be the judge.  

Loop Stitch

First we have the Loop Stitch.  This stitch is as straight forward as you can get.  You start the lace by putting the needle in between the leathers and pulling it through the "inside" hole and then loop it over and lace it through the "inside" of the project through to the "outside" and repeat.


When you need to splice start the new lace a few holes down from the end of the previous lace in the same way you started (between the leathers toward the inside).  Take the old lace and loop it until you reach the new lace, put the needle through the last "inside" hole and pull it up between the leathers.  This should create the illusion that the lace doesn't stop.  Cut off the excess lace and continue to lace until you reach the end.  You end the lace in the same way you splice it.  Lace until you reach that last "inside" hole and pull it between the leathers and cut off the excess.  Tuck any lace ends in between the leather and you are done.  Simple as that!  (I do not have photos for these last steps because I haven't finished a project with these stitches recently.  I will do my best to get photos up as soon as possible.)

This is a good stitch to start on as it is really easy.  Personally I do not care for the look or the strength of this stitch so I only use it while teaching beginners how to lace so they get used to working with it.  Another item to note, this will come up again in the Double Loop Stitch Entry, be sure that the "finished" side of the leather is the part that is always up.  You do not want any kinks in your lace.  This is easy to keep track of in Loop stitching and easy to fix.  This is also important in the next stitch:

Buck Stitching

Buck stitching is similar to loop stitch except you are not looping the lace around the edge but weaving it from the "inside" to the "outside" of the leather.  Also it is traditional to use a larger lace than usual for the buck stitch. You can do the buck stitch in two ways.  

If the holes are in a straight line then you start it in between the leather and pull it through the "inside" hole.  You twist the lace and pull it through both holes to show the "finished" side of the lace.  Once it is pulled out the back then you twist it the same way and pull it back through showing the "finished" side on the back as well.
NOTE: Traditional buck stitching uses much thicker lace for a decorative touch.  I'm working with what I have.  


Continue until you get to the end (or need to splice) and then lace it up to the last hole and pull it up between the leathers and cut off the excess and tuck it in between the leather.  (Splicing you just start the new lace a few holes down and the go back and finish the old lace up to the new lace and pull it in between the leather.)  

If the holes are slanted then you do almost the same thing.  Pull it through the inside hole then back through the next hole but there is no twisting on this one.  Weave it in between the holes and this will make it so the tooled side will see the finished side of the lace while the inside of the project will see the flesh side of the lace.  Make sure there are no kinks is extremely important in buck stitching as that is a big part of what this type of stitching.  (I do not have pictures of the splicing for finishing of this type of lace either.  Nor do I have a picture of what the slanted buck stitch looks like.  Again I'm working on that and I will get those up as soon as possible.)  

Buck stitching is used mostly as a decorative stitch, again because it isn't the strongest stitch, and traditionally used in basic Western style leather crafting.  (This is another reason I don't use it I don't do western style tooling as often.)  

There is one other type of stitching that you can do that I will not be covering in any of my entries.  That is machine sewing or stitching.  I mainly won't cover these because I don't have a sewing machine that can sew leather.  If I ever do get a machine that does so I will let you guys know.  (I also will have more than likely won the lottery to afford one.  So you may not hear from me at all.)  

That's all I have for now.  Until next time, Happy Crafting!

Just a Test

DCAANEEK334H 

Schedule

I wanted to take a moment and discuss the posting schedule with you.  I understand it is important to keep some semblance of a schedule to keep people engaged.  (Trust me, I understand the frustration of clicking on a link of a favorite site to see they haven't updated any content since the last time you visited.)  The long and the short of it is I don't really know what my schedule will be.  (I also understand that can be frustrating as well.)  My ultimate goal is to post on Saturday, Sunday, and Wednesday.  I realize that is a little wonky and abnormal but I want you have to as much fresh content as possible and not destroy my marriage in the process.  Due to my work schedule I can't do a lot of work on leather during the week.  If I'm not working with leather, I'm not creating material for the site.  But right now I may have trouble posting with that schedule but I can guarantee you at least 2 posts a week for the next few weeks and then I should be able to get on track.  I have a lot of great ideas and I can't wait to show them them off.

As always let me know if you have any comments or questions.